Complete Roguelike Tutorial, using python3+libtcod, setup Windows
Setup Windows
Installing an Editor
Installing libtcod
Download the latest release of libtcod 1.6 and extract it somewhere. Be warned that both Python and libtcod must either be both 32 bit, or both 64 bit. If you get dll loading errors, getting this wrong is the most likely cause. libtcod will now (as of 1.6.2 and above) check they are compatible, and tell you if they are not.
Installing Python
If you haven't already done so, download and install Python 3.6. Any version of Python 3, from 3.6 and above should be fine, but the latest update (of Python 3, not Python 2) is of course always preferable.
There are reports that for older versions of libtcod on 64-bit Windows (Windows 7) that the 32 bit version is preferable, since the 64 bit version of Python seems to cause problems with libtcod. This was been tested on Windows 10 with libtcod 1.6, and was not reproducible, so it's up to you.
It might be advisable to go with 32 bit just to keep things simple, and when you're gone through the tutorial look at switching to 64 bit if it matters to you to do so, and if you do encounter errors specifically related to this, report them on the libtcod bug tracker.
Setting up your Project
Folder structure
Our first roguelike will be run entirely from a single file, firstrl.py. However, to support some future needs regarding packaging and to make development easier, we need to add our dependencies into the project folder.
When we're all done, the basic folder structure should look like this:
\project\ \libtcodpy\ \tests\ firstrl.py
The images below should help further qualify.
Your project folder
Now create your project's folder. Inside it, create an empty file with a name of your choice. We're using firstrl.py. It'll make the tutorial easier to just use the same name, and you can always rename it later.
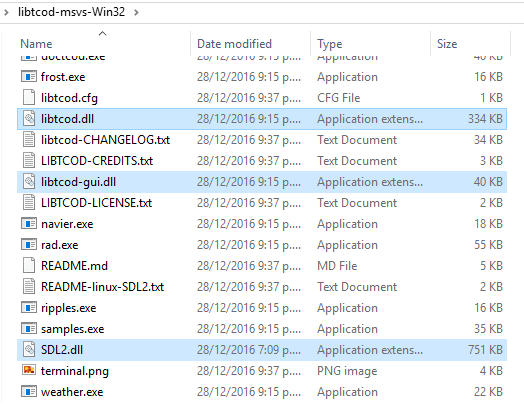
From within the libtcod build you downloaded above, select and copy the relevant DLLs.
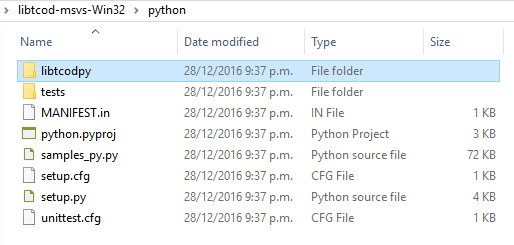
From within the libtcod build you downloaded above, select and copy the libtcodpy folder.
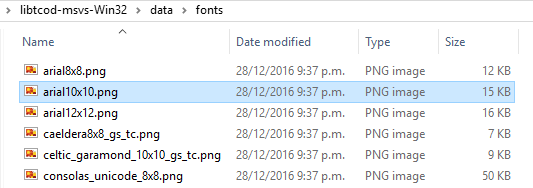
From within the libtcod build you downloaded above, select and copy the arial10x10.png font. If you choose a different one, you'll need to adjust how you do the tutorial accordingly. It's simpler to just use the same one as we do, and change it later, if it suits you to do so.
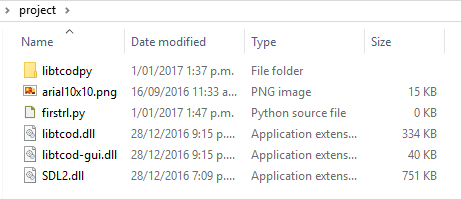
At this point, you should have a folder that looks like this:
Validating the setup
libtcod is compiled with the latest official release of Visual Studio. In an ideal world, it should just run, and if you have recently updated games installed from Steam or perhaps even some modern applications, it should. However, some people lack the support for that latest release of Visual Studio, and these steps help update your computer to allow libtcod to be run.
- Within the libtcod release you just extracted, you will see a file called samples.exe.
- Run samples.exe and verify that it appears to work. If it opens a colourful window, then it is now verified as working for you.
- If it just doesn't start and instead you see a message about vcruntime140.dll being required, then you need to install the correct Visual Studio 2015 runtime.
- Go to the latest Microsoft Visual Studio 2015 runtime download page, and download and install the runtime that matches the Python and libtcod you are using. If you are using 32 bit Python and libtcod, this will be the x86 runtime. If you are using the 64 bit Python and libtcod, this will be the x64 runtime. (Tip: If you think you might switch from 32 bit to 64 bit in the future, hedge your bets and install both runtimes to prevent future problems.)
- Once you've installed the correct runtime, run samples.exe and verify that it now appears to work. If it still gives the same message, you didn't install the correct runtime. If it opens a colourful window, then it is now verified as working for you.
- If it is not verified as working for you, you can open a libtcod bug report on BitBucket.
You've verified that libtcod is working? Great! You can move onto the next section.
Your project folder
Now create your project's folder. Inside it, create an empty file with a name of your choice. We're using firstrl.py. It'll make the tutorial easier to just use the same name, and you can always rename it later.
From within the libtcod build you downloaded above, select and copy the relevant DLLs.
From within the libtcod build you downloaded above, select and copy the libtcodpy folder.
From within the libtcod build you downloaded above, select and copy the arial10x10.png font. If you choose a different one, you'll need to adjust how you do the tutorial accordingly. It's simpler to just use the same one as we do, and change it later, if it suits you to do so.
At this point, you should have a folder that looks like this:
Finishing touches
You're ready to start editing firstrl.py!
Now you're ready to start writing code.


